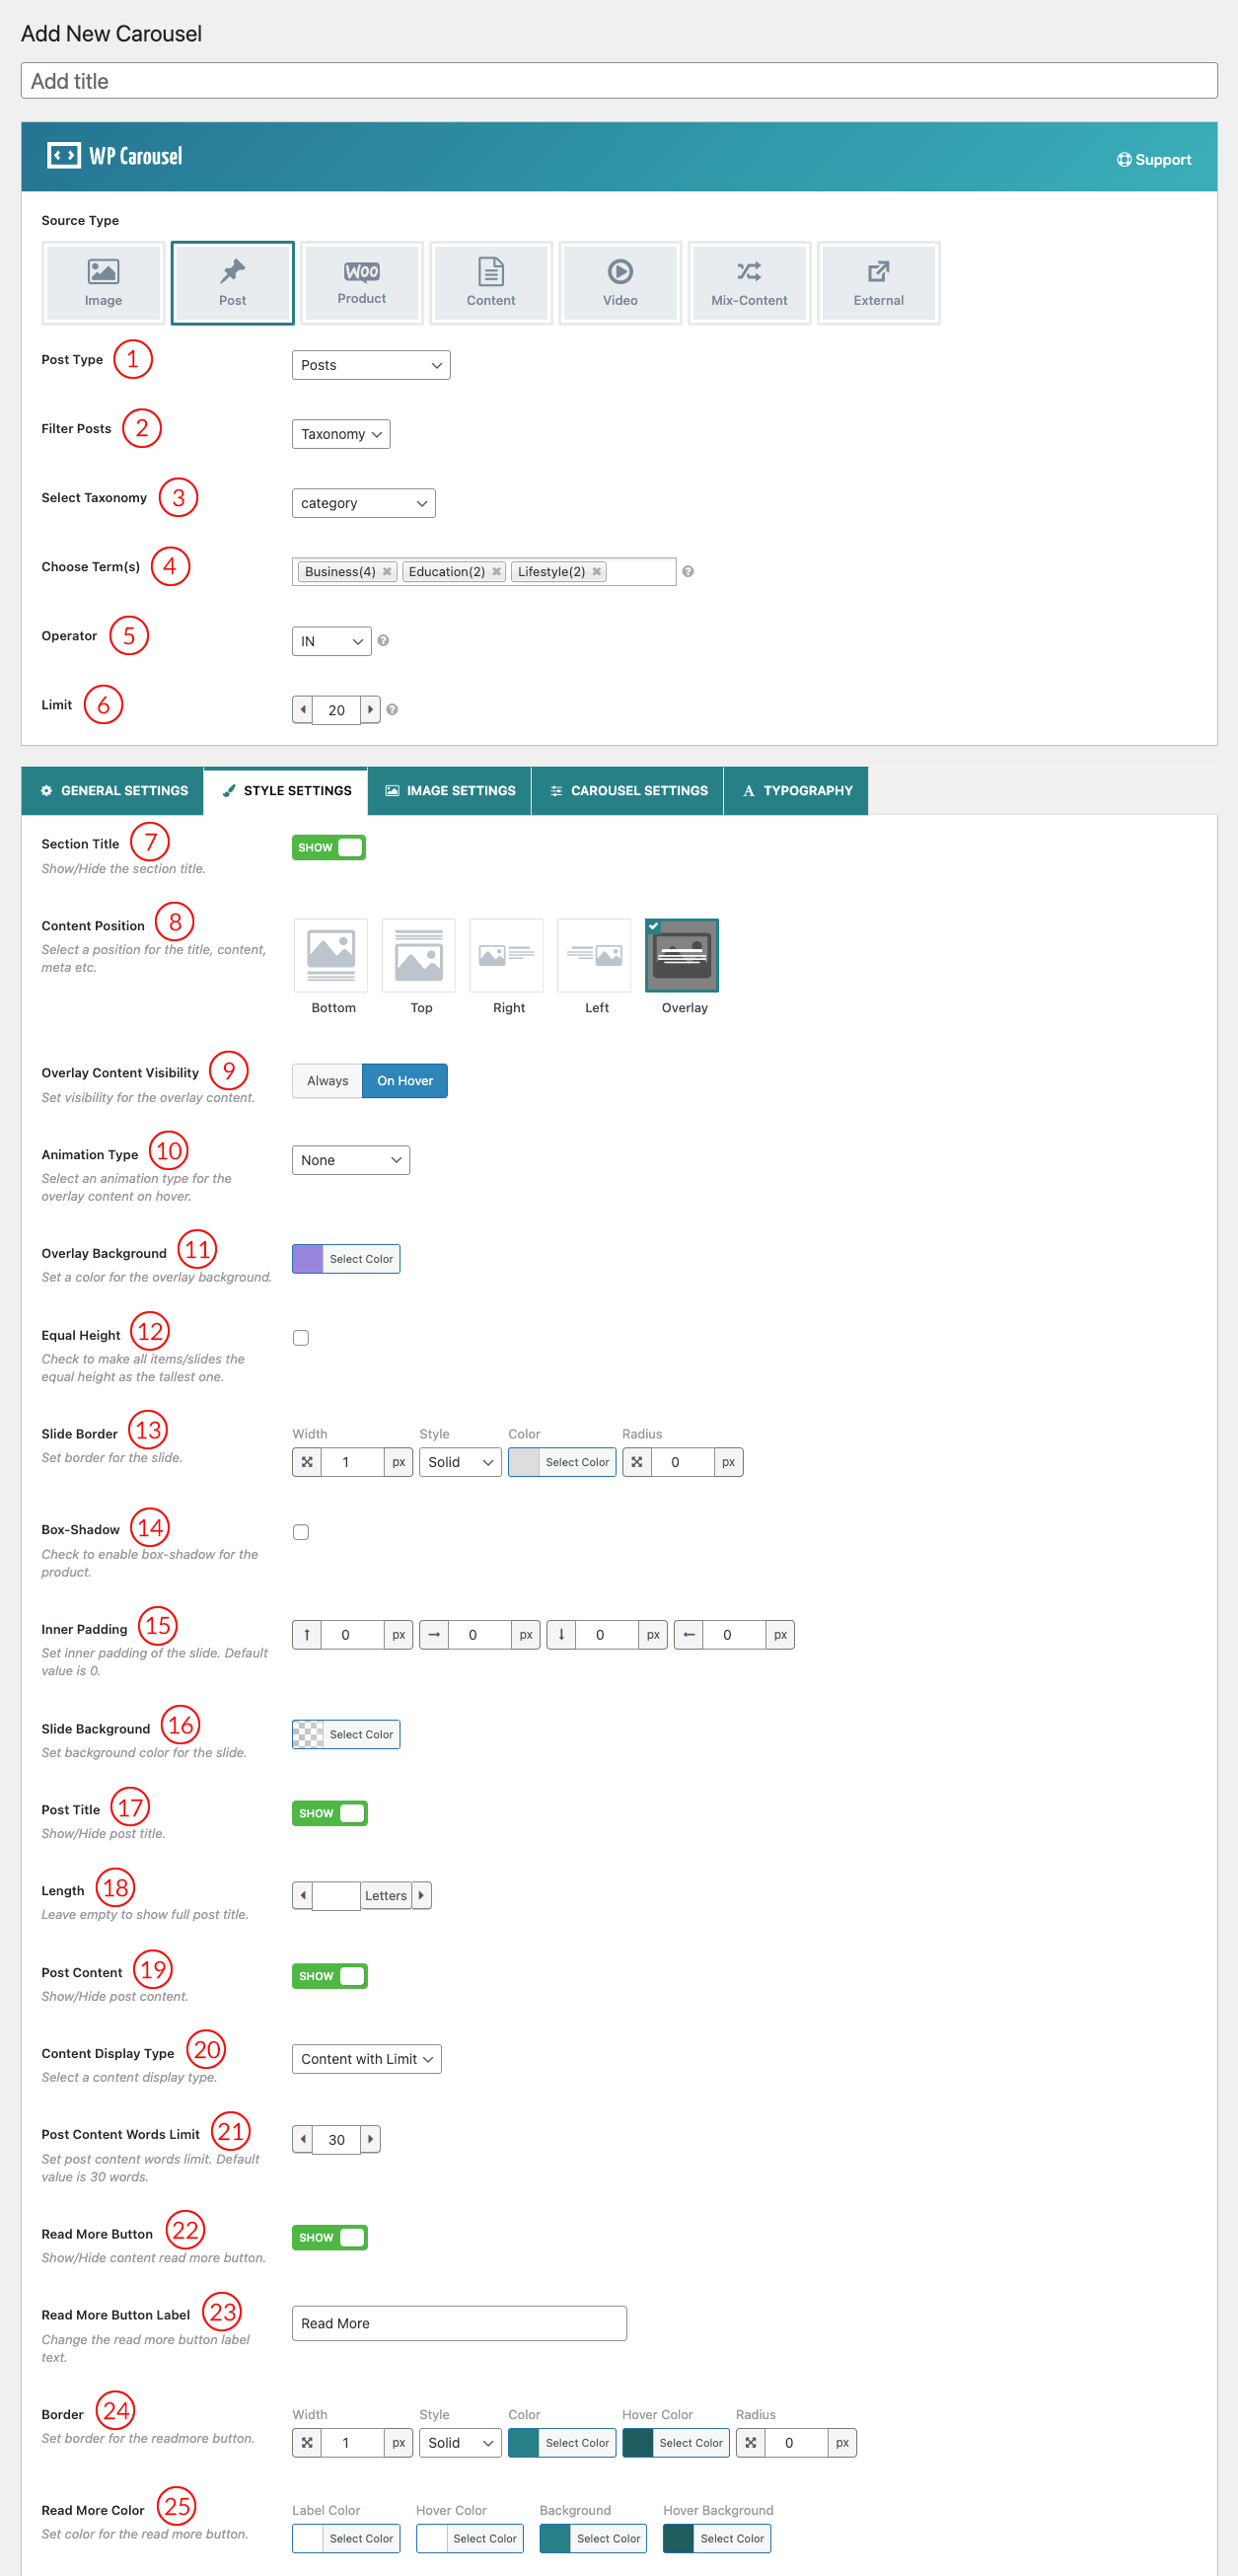
(1) Post Type: Select a Post Type to display your posts as a carousel. You can choose among:
- Posts: If you choose this option, All posts will be displayed as a Carousel.
- Pages: If you choose this option, All the page content will be displayed as Carousel.
- Products: If you choose this option, All the product’s content will be displayed as Carousel.
- Multiple Post Types: If you have a Custom Post Type you can find your custom field below the post, page, and Attachment option.
(2) Filter Posts: Select one for Filter Posts. You can choose among:
- Latest: If you choose this option, All the latest posts will be displayed in the Carousel.
- Taxonomy: Taxonomy is the way to organize your posts into categories and Subcategories. After Selecting the Taxonomy filter, some new options will be added.
- Specific Posts: When you select this option Only your selected post will be displayed in the carousel. Set Posts in the Select Posts option that you want to show in the Carousel.
(3) Select Taxonomy: Select one to display your posts in the carousel. Options are:
- Category
- Post_tag
- Post_format
(4) Choose Term(s): Select Taxonomy terms to display your post in the Carousel.
(5) Operator: Select the Taxonomy Terms Operator to show the posts. Options are:
- IN: Show posts which associate with one or more terms.
- AND: Show posts which match all terms.
- NOT IN: Show posts which don’t match the terms.
(6) Limit: Set the Number of Total posts to show in the carousel. The default value is 20.
(7) Section Title: Show or hide the carousel section title.
(8) Content Position: Content position is where you want to display your carousel item contents. Select a position for the content title, description, meta, etc.
Options are the following:
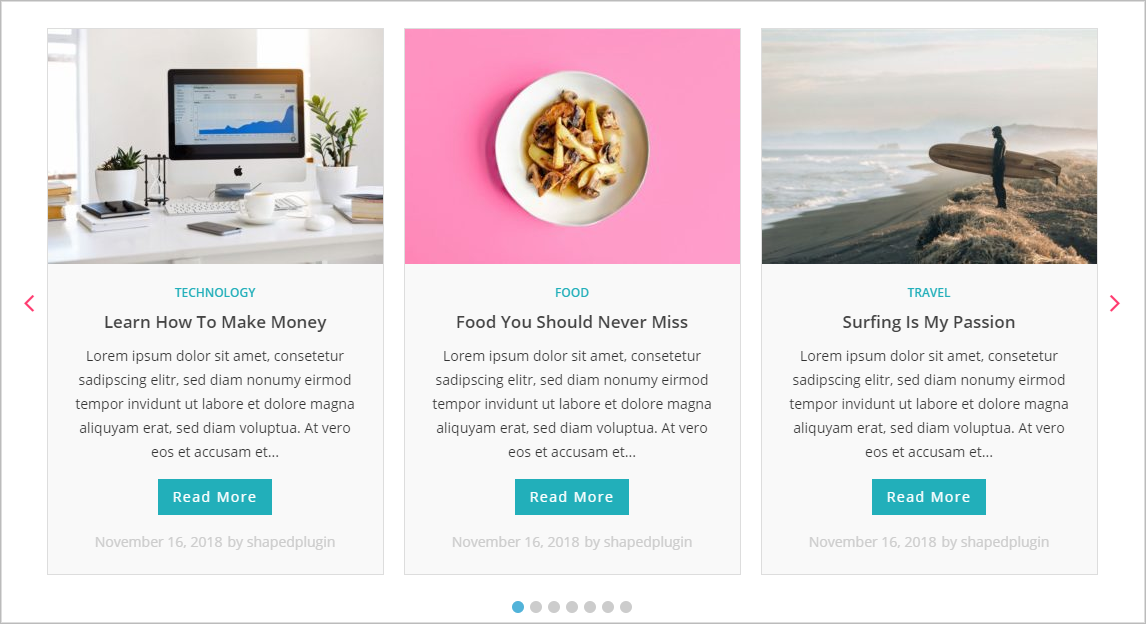
A. Bottom: Post Content will display Below the image.
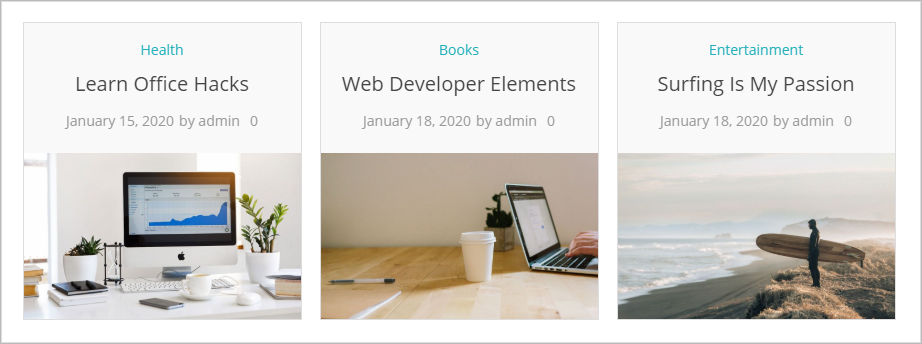
B. Top: Post Content will display Above the image.
C. Right: Post Content will display at the Right of the image.
D. Left: Post Content will display at the Left of the image.
E. Overlay: Post Content will display when users hover over an image.
A. Bottom Content Top Image:

B. Top Content Below Image:

C. Right Content Left Image:

D. Left Content Right Image:

E. Overlay Content:

(9) Overlay Content Visibility: Set visibility for the overlay content. Options are:
- Always
- On Hover
(10) Animation Type: Select an animation type for the overlay content on hover. Options are:
- None
- fadeIn
- fadeInDown
- fadeInRight
- fadeInLeft
- fadeInUp
- flipInX
- flipInY
- slideInUp
- slideInDown
- zoomIn
- zoomInDown
- jackInTheBox
- rollIn
(11) Overlay Background: Set a color for the overlay background.
(12) Equal Height: Check the box to make all the items/slides the same height as the tallest one.
(13) Slide Border: Set border around the carousel Item. There are 9 different border styles. You can also set your desired border color. Options are:
- Solid
- Dashed
- Dotted
- Double
- Inset
- Outset
- Groove
- Ridge
- None
(14) Box-Shadow: Check to enable box-shadow for the Post carousel items.
(15) Inner Padding: Inner Padding is the space that’s inside the carousel item between the item and the border. The default value is 0px.
(16) Slide Background: Set a background color for the slider items with this option.
(17) Post Title: You can Show/Hide Post Title by this option. By default, it is set to Show.
(18) Length: Set post title length as per your need. Leave it empty if you want to show the full post title.
(19) Post Content: This is the option you can Show/Hide the Post Content as you wish. By default, Post Content is set to Show.
(20) Content Display Type: The Content Display Type specifies how the post content (description) will be displayed in the carousel. Options are the following:
- Excerpt: An excerpt in WordPress is a term used for an article summary with a link to the whole entry. An excerpt can be auto-generated by a WordPress theme or by using the <!–more–> tag inside the post content. Another way to create excerpts for a WordPress post is by entering the summary of an article in the Excerpt field on the Post Edit screen. This field is not displayed in the post-edit screen by default. To enable it a user needs to click on the Screen Options button on the top right corner of the post-edit screen and then enable it.
- Full Content: With this option, the user can display the full content of the posts.
- Content with Limit: Users can set Word limitations in terms of showing a post’s content.
(21) Post Content Words Limit: Set post content words limit. The default value is set to 30 words.
(22) Read More Button: Users can Show/Hide the Read More Button as per their need.
(23) Read More Button Level: The user is allowed to change the read more button label text as they wish.
(24) Border: Set the border for the Read More button.
(25) Read More Color: Set the Read More button Color, Hover Color, Background, Hover Background, Border, Hover Border as you want.

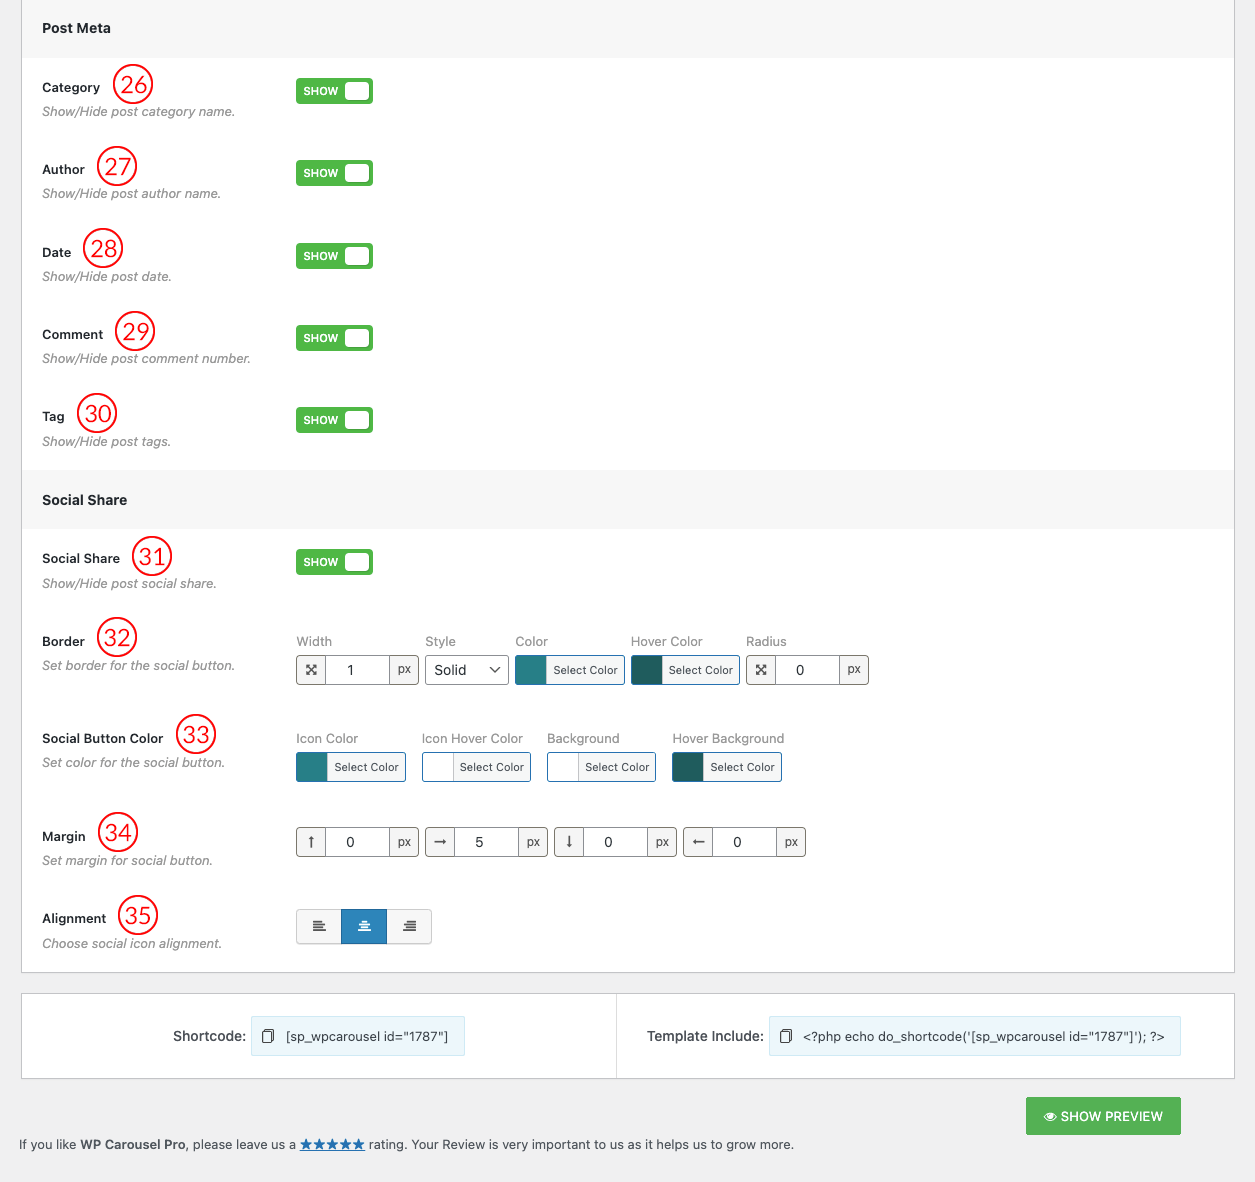
(26) Category: Show/Hide Post category name. The default value is Show.
(27) Author: Show/Hide Post Author name. The default value is Show.
(28) Date: Show/Hide Post Date. The default value is Show.
(29) Comment: Show/Hide Post Comment Count. The default value is Show.
(30) Tag: Show/Hide Post tags. The default value is Show.
(31) Social Share: Show/Hide post social share.
(32) Border: Set a border for the social button.
(33) Social Button Color: Set the color for the social button.
(34) Margin: Set margin for social button.
(35) Alignment: Choose social icon alignment.